Sunburst Key Holder

IMAG1836

Sunburst Theme to brighten your decor

I am realizing the utility of keyholders and I enjoy welding them.  They are usually simple and not very big so they would be a lower priced item in my collection.  The key holder featured here is a sunburst made from a hemispherical pipe cap and square cut nails braze welded together using bronze filler rod. The nbronze joints add some interesting contrast to the grey steel.  I took it a little further and decided to accentuate it a bit.

il_570xN_495877193_9e8k

First I coated the wire brushed sculpture with Krylon Crystal Clear Flat.  This will help seal the bare metal surface from oxidation while providing a dull matt surface to paint on. What I was going for was an warm orange hued bronze color affect on the sun. I also decided to even out the color of the grey steel with darkened silver paint.  For the accent paints, I used water based acrylic metallic paints.  I used the dry brushing technique to apply layers of the metallic paint to minimize brush strokes and to quicken dry time between coats.  I first applied a little copper colored paint to the sun to brighten it. Afterwards, I mixed some copper with bright gold to get a bronze color.  This went over the copper color and it created much depth. This was especially true after I covered the whole thing with Krylon Crystal Clear Gloss.  As you can see from the photo, it really came alive. This sunburst kep holder is listed in my Etsy shop.

Finished 3D Geometric Sculptures

IMAG1740

3D sculptures look bulky without the weight

I had mentioned in previous posts about making dimensional shapes from sheet metal and cylinders from steel tubing.  If you read those, you are probably wondering what this was all leading to.  And the results are shown above.  Two dimensional contemporary steel sculptures made up of simple yet elegant geometric forms.  They look like solid blocks of metal but they are indeed metal.

IMAG1736

My most recent creation is this 19 inch tall contemporary steel triangular masterpiece based on an elongated three dimensional triangle mounted on its vertex for visual effect.  To add warmth and interest, a steel strip was formed into a wave and welded on.  It was painted with colored lacquer in red, orange, and yellow in a manner to accentuate the undulations of the curve. 

IMAG1739

The sculpture was hand welded with an oxyacetylene torch to minimize spatter and porousity in the welds.  Also, there seems to be a soothing and relaxing aspect to handling and using a gas torch.  After cutting all the required shapes for the composition, it can be a real challenge to get everything to line up just so.  To make it a little easier, I usually tack weld the forms together with a wire feed welder just to keep everything together and to prevent heat warping.  I then go over the edges with the torch flame to fusion weld them.  It is best to try not use too much of the welding rod as it creates extra material to grind off.  Once the welding was complete,  It was time for the grinder patterns to give that blazing shine you get in direct intense light.  See the photo below for a contrasting shot of the triangular sculpture in direct sunlight with deep clear blue sky as a backdrop.

IMAG1735

Breathtaking isn’t it?


IMAG1741

The other sculpture is a little more complicated.  It is 3D contemporary steel composition composed of 4 distinct shapes welded together.  All the shapes where given a dazzling grinding patter to reflect direct light.  Additionally, the smaller shapes where colored with tinted lacquers to enhance the depth of the reflective shine.  My favorite is the deep red tetrahedron.

IMAG1742

What also sets this sculpture apart from the rest is the bronze filler around the welded joints.

IMAG1587

Taking a closer look at the violet rectangular accent and you can see how the bronze really adds a nice contrast to the deep cool violet lacquer finish.


How to make a Hollow Steel Cylinder From Tubing

IMAG1568


Cylinder from 2 inch tubing

I have been recently working on some 3D Geometric shapes from 16 gauge steel I plan to use in a sculpture.   So far, my inventory consist of a 4 inch tetrahedron, and a small rectangular box.  Before I go on to make the larger box that will be the main body of the sculpture, I decided I need one more smaller accent piece.  After spotting some old rusty 2 inch diameter tubing in my closet, I thought it would be perfect for the task.  I simple cut out 2 inch diameter disk from 16 gauge steel sheet and round them out with the grinder.  Then I weld them on to each end to the section of steel tubing I have chosen.

IMAG1569


For starters, I decided to place one tack weld with my flux cored wire feed welder from the tube to a 1/4″ steel place just to keep it in place.  I did that becuase there are times the wire feed from the welder may knock the workpiece down if it fails to make proper electrical contact.  I placed one of my hand cut disc on the top and attached it with four tack welds.  Afterwards, I was easily able to break the tube of the steel plate due to the small size of the tack weld.  I proceeded as above to attach the other disc to the tube via tack welding.

IMAG1572


This is the rough draft.  As you can see there is up to 1/8″ overhang from the disc.  That is from tracing the paper circle onto the steel sheet.  Might not be much to look at now but the extra material eliminates the need for filler metal when torch welding.  Yes I will be and have been welding the steel sheet shapes with an old fashion oxygen acetlylene torch outfit.  The oxyacetylene torch is the most versatile piece of equipment for the metal artist.  You are able to braze weld different alloys together,heat metal to bend or form it, pierce or cut steel, and of coarse gas weld mild steel.


IMAG1578IMAG1577


The last two photos show the cylinder after is has been gas welded and grinded smooth along with the small box and tetrahedron  with an abstrasive grinder.  Not too shaby if I do not say so myself.

Updated Banner in my Etsy Shop

banner

This a banner I recently designed on www.bannerfans.com.  After I saved all the changes, I uploaded it to my etsy shop.  I am trying to decide if the bright blue color really does any justice to the image I wish to brand and market.  I still have some hurdles to overcome but yesterday was a major milestone.  I sold two higher end sculptures in one day and was paid 35-40% of what my full time job pays me in a week.  Each sculpture has no more than 3 hours of solid work from start to finish.  So the way to celebrate is to give my Etsy shop a new look.

Creating 3 D forms With Steel sheet

IMAG1481

Geometric 3D Steel Shapes for Sculpture

One of the best ways to show off color with metal sculpture is using bold 3D geometric shapes with hard crusp lines.  Still deciding on a composition, I wasted no time getting started on a couple fundamental shapes. On the left a rectangular box made from 16 gauge steel sheet.  On the right, a tetrahedron from same sheet consisting of four equilateral traingles with all sides being 4 inches.  I used my Hobart 125 EZ to tack weld peices into place and then followed by gas welding with my Harris oxy acetylene torch. Torch welding affords a smoother weld with no pin holes.  That is good news when it comes to cleaning up the shapes with the grinder. 

IMAG1483IMAG1482

These are truly diamonds in the rough.  I will clean these up and create a few more geometric elements for my next sculpture.

Art Deco in Art and Designs

What is Art Deco

 
this lens' photo

Art Deco was a style of art and architectural design from the early 20th century. Namely the roaring 1920’s but it continued nearly until the modern art movement in midcentury. This style followed the ornate and elebrate stylings of art nouveau with more simple lines and geometric forms. Some art deco designs are indicative of the era of automated manufacturing and have a decidingly mechanical and futuristic appearance. There are reliefs and sculptures in architectural suggestive of ancient Egyptian themes due to the much publicized discoveries made during the early 1920’s
 

Art Deco Architecture


Chrysler building One of the crowning achievments of Art Deco architecture was the Chrysler building in New York City. It was built during the 1920s and features brilliant stainless steel deco. Incidentely, stainless steel was just discovered around this time.
 

Art Deco Kinetic


Art Deco steampunk This is a truly unique kinetic sculptural desk fan. It nicely incorporates the simple lines and geometric forms in art deco with the brass and mechanations of 19th century influenced. The copper dome really sets the whole piece off. The fact it was hand done shows superb craftmanship.
 

Art deco pendant


Art Deco pendent This one of a kind art deco pendant featuring lava and czech glass incorporates the geometric lines of classic art deco design. The finish the artist uses is an epoxy finish to give depth and definition.


Egyptian Influence in Art Deco


Eye of Horus With the historical discovery of King Tuts tomb in 1922, ancient egyptian art and design heavily influenced the art deco movement. I attempted to capture the essence of ancient Egypt in this Eye of Horus sculptureTake a look at the wood board background with the distressed faux gilded finish. It was applied over a black basecoat in the photo below.

Mid Century Design

this lens' photo

Mid Century or , more commonly, modern art was the significant movement in design that had its influence from the early 1930’s to around the mid 1960’s. That puts it pretty much following the art deco movement. Modernism saught to follow the organic forms of nature with simplistic shapes and forms.The modern movement was widespread as it influenced architecture globally and also furniture and art as well.


Furniture Design


Charles Eames Lounge chair A signifcant part of the modern design movement was seen in furniture. Take for instance this Eames lounge chair featured in this photo. Charles Eames and his wife Ray eames where cutting edge designers. Charles studied architexture at Washington University in St Louis where he met his wife. Together they developed many designs based on newly available materials like plastics and resins.


Modern Architecture


modern architecture Modern architecture is the design of buildings and homes in a simple unornamental design. The modern design for architecture is a look of science and technology. Usually, the designs entails the use of alot of glass, steel, and concrete.
 

Geometric Form


Mid century wall art The modern art movement in the middle of the last century was heavily inspired by the prospects of technological innovation. It represented a time when we were engaged in a space race and new space age materials where being produced like plastics, titanium, and superalloys. The lines and forms of this era where simple and, in many cases geometric. Many times, geometric form was used with striking color contrast that boldly engages anyone who enters the room.
 

Mid Century nails sculpture


Mid Century Nail Art A fairly common theme from the modern era is braze welded masonry nail art. This is one of my favorite mediums as i work in this quite often.
You can visit my brazed nail art lens to see what I have available.

Etsy Coupon for August

il_570xN.488859441_v5fk

Mid Century Nail Sculpture

There is a new Etsy coupon code for my shop for August in celebration of my newest work.  Every item in my shop JTB Metal Designs is 15% when you spend at least $30.  The coupon code is MIDCENTURYMADNESS and it expires August 31st 2013.

I recently uploaded my latest creation to my Etsy shop.  It is an Eames era Mid Century Modern Metal wall sculpture made from cut nails brazed together in a geometric formation.  This in turn is adorned with hand formed brass and copper decorative accents.

Cut Nail Sculpture with multicolored accents

Multicolored accents on steel nail sculpture
 
I found it was time to make a bigger braze welded sculpture. To enhance this sculpture I chose steel accents painted in brilliant multicolored metallic colors.  These where airbrushed over the primed geometric accents.  These, along with the brazed nail support, where sealed with a gloss lacquer finish to enhance the metallic finishes.  This sculpture is available in my Etsy shop.
 
IMAG1460
 
When I made this sculpture, I attached mounting hooks so it could be wall mounted either horizontally or vertically to increase versatility.  Mounting this vertically will get you the most decorative impact when horizontal space on a wall may be limited or if you need to change the perspective in your decor.
 
 
IMAG1463
 
Near Perfect Circle Without Plasma Cutter!
 
All these accents were meticulously HAND CUT with an angle grinder.  No plasma cutter or water jet was used!  The circle above looks perfect but it is not.  I was designed with a $2 compass, a Sharpie and was cut manually from 16 gauge steel sheet.  The lines were maintained and after cutting as close as possible to the lines without removing them, the shape edges where grinded to the lines. 
 
IMAG1468IMAG1470
 
Controlled Spraying Creates Interesting Effects
 
The metallic paints where applied with a single stage airbrush.  Two or more colors were sprayed on the accents to give interesting shading and contrast effects. Take note that the single stage airbrush lacks the precision and the finesse of a two stage aribrush with a trigger assembly.

Copper Chloride Solution for Etching and Descaling Copper Alloys

IMAG1459


This informative blog is about making a oxidizing acidic etchant/cleaner for copper alloys from readily available materials.  When working with copper, brass or bronze it is typical that the studio artist must heat said alloy to red heat to anneal it.  This is a process that loosens the crystalline structure of the alloy allowing it to be easily formed and worked.  After working these alloys though, they tend to work harden as the tiny crystals within the metal get packed tighter and tighter by the working and/or forming.  During a typical project these repeated heating cycles build up a tough layer of metal oxides that need to removed if a shiny surface is desired.

To accomplish this task you need an acid solution.  More importantly, an acid solution that is also an oxidizer able to oxidize corrosion products to a more soluble state to assist in removal.  Also, an acidic oxidzer is also usefull in etching copper alloys as well creating relief patterns when suitable resists are used.

For removing fire scale from copper alloys, especially brass,  can be a tough endeavor.  That is because the other alloying elements present with copper in brass, namely zinc, also form oxides along with the copper oxides.  Just using a non oxidizing acid such as diluted hydrochloric of sulfuric acids will leach the zinc from the surface leaving unsightly pink blemishes.  These blemishes are concentration of copper that have been dezinced.  This coating can be very tenacious needing abrasive mechanical removal.  The traditional method to combat this was to dip the brass in a mix of concentrated sulfuric and nitric acids.  Although effective, the chemicals are extremely corrosive, give off deadly fumes, and nowadays very difficult to find and quite expensive.  Then there are legal aspects for obtaining, using, and storing these reagents that make the ideal completely impractical.

For etching, typically a solution of ferric chloride would be used as it is readily available at any well stocked electronics supplier.  This is a metal salt that forms an oxidizing acid in solution.  The disadvantage is that it only can absorb a finite amount of copper before the solution is exhausted.  In this case you are left with a potentially pollution hazard that needs special treatment for disposal.

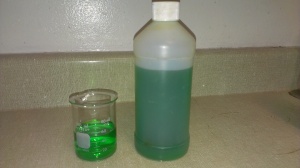
There is a chemical that is easily made from cheap and readily available materials and it can be regenerated so there never is any need for disposal issues.  Whats more is that it can preform as an effective etchant and a decent fire scale remover as well.   That chemical is copper II chloride.  It also goes by an archaic name  as  cupric chloride.  It is a bright emerald green poisonous compound that makes an oxidizing acid solution.

The main ingredient to start preparing a copper II chloride solution for your own use is muriatic(hydrochloric) acid.  This fuming liquid is available at many home improvment, paint, swimming pool suppliers, and hardware stores.  The typical concentration is 31.45%.  For our use you can use about a 10% solution to start with.  Stronger solutions could be used if you are working with 3% hydrogen peroxide.  First you will need som copper scraps and hydrogen peroxide.  Put these in a non reactive nonmetal container.  Cover copper with diluted muriatic acid.  Next you will add the hydrogen peroxide in small portions because of excessive fizzing.  There are various strengths of peroxide on the market from 3% up to about 30%.  The peroxide from the drug store is 3%.  You might find peroxide at a beauty supply that is 6% to 15%.  Stronger solutions of peroxide are available as a non chlorine sanitizer for pools and spas.  Just remember that if you use stronger peroxide dilute your acid and be more careful with adding the peroxide as the reaction may tend to overflow the container.  It is best to use a container much bigger than the solution you are working with.  For the drugstore 3% peroxide just use muriatic acid in full strength or diluted to 16%(which is one part muriatic to one part water).  The solution will become rich green very quickly.  Leave solution time to stop bubbling overnight.  Next day, pour off the clear green liquid into a non metal sealable container for storage.

If the idea of handling both peroxide and acid alarm you, there is an other way.  It just takes more work and a longer time.  Take some muriatic acid and dilute with equal amount of water. Add as much old tarnished brown copper as possible then let sit.  After an hour or so pour off acid solution and repeat with more oxidized copper until the solution is sufficiently green.  Alternatively, you can heat shiny copper until it is black/brown and dip in the acid as many times as necessary until the desired level of green is reached.