Bright Metal Wall Art

Minimalist Wall Art

A solid welded steel wall sculpture in minimalist abstract styling welded in bold simple colors. Each piece was cut carbide tooling to produce nice edges and arc welded by hand to a geometric abstract configuration ideal for casting different shadows in different lighting angles. The freeform style allows this sculpture to be hung in any direction that suits your decor needs. At 18” height, 13 inches in width and less than 2 inches deep, this minimalist sculpture could accent a larger piece of art or stand alone on a narrow fence or wall.

Post Modern Metal Wall Art with a Rustic Twist

This postmodern minimalist wall sculpture is hand welded and blends bright paint colors with the look of bare metal. Sweeping curves and simple primary colors hint at Mondrian or Memphis art style influences. The bare steel frame tones down and contrast adding a slightly rustic appearance.  

This is a smaller accent piece made from hollow square steel tubing and 1/8 inch steel plate and measures 10.25”X 13” and 1/2” deep.

To give a more visual appeal, the painted shapes were contrasted with bare steel for texture and tonal effects. the bold colors still pop but the bare steel blends with most backgrounds yet creates a presentable frame for the multicolored shapes.

Postmodern Steel Wall A

Treasure From Trash: How Discarded Metal Home Furnishings Get A New Life Part I

image

Discarded Metal Home Furnishing

One this about living where I do is that we have community dumpsters.  As a metal artist, I often look at new metal stock and  visualize metal art compositions.  Other times I pass a dumpster and see a discarded metal object and I snag the opportunity.   I am not sure if this was a magazine rack or a wine bottle holder.  Feel free to comment if you know.  All I knew was there was already a bunch of perfect rings that were screaming for a new lease on life.

image

Removing Woven Material

Once I acquired this item from the dumpster,  I was already designing wall decor in my mind.  With that in mind, I saw no use in keeping any of the woven top featured in photo above.  Now I could have used a grinder or hammer and chisel to break through.  It was pretty warm out and thought all that labor was little bit much.

image

Into The Fire Pit!

I had some old bills and documents. So I put the woven table upside down in the fire pit and then the bills as kindling.  Poured kerosene until the a paper was soaked and the woven material was damp.  I lit it with a min torch.  The woven material was gone in less than 2 minutes.

image

Enter a caption

Metal On Fire

Aside from looking completely awesome, this fire served three useful purposes.  One, I got rid of a stack of papers that cluttered a shelf in my dining area.  Two,  I wanted to remove the woven material from the metal frame without using cutting tools.  It is fact made from a plant based fiber material and was quite dry so it combust rapidly and easily.  Third, there was a flat black paint on the metal frame.  The heat breaks down the larger organic molecules in the paint into smaller ones.  This makes the paint and any primer underneath easily removed with a wire brush.  Although fire can be very dangerous if misused, it is very handy when working with steel and other metals with high melting points.

Ring Panels Removed

Afer everything cooled down I had only a metal framework to deal with.  It turns out I have useful patterns and components for  a few artistic creations.  I got my 4.5″ grinder out and began to cut the welds joining the ring panels to the rectangular frame.  Despite the number of cuts, the rods are only 1/4″ to maybe 5/16″ thick so this process went by quickly.  I found myself with two ring panels roughly 17 inches wide and 26 inches long.  My next task was to take a wire brush to the ring panels.

image

Most of the paint came off but there is some residue.  That is of little concern, since I only need an electrical connection for arc welding.  Once I get the accessory pieces welded and joined on, I will repaint this flat black again anyways.


STAY TUNED…..


Public Metal Art in Unexpected Places

I was driving one of my Uber riders to work this morning in a rather rundown part of town.  This is something I do between other jobs as a gap filler for extra income.  The area was an industrial/warehousing area that left much to be desired.  It was a cloudy and rainy Monday’s so I definately was in blah land.  Then suddenly when I was turning a corner into the lot for this particular warehouse my rider works at, I see two very imaginative rusty metal compositions standing there.

imageIt was a definate boost to get my creative juices going.  It was at this moment that it dawned on me one purpose of public art.  To create something aesthetically pleasing in an otherwise drab and uninspiring area.

image


Brazed Metal


image

Accented Braze Nail Sculpture

A lot of my work revolves around braze  welded     square cut nails.  This concept was originally developed during the mid century movement in the 1950’s,1960’s, and 1970’s.  It has seen somewhat of a comeback. Personally, I love the aesthetic quality the brass joints contribute to the steel nails.  I put my own personal twist to this concept by creating and using my own accents.  The piece pictured above, Eames Era Accented Brazed Sculpture, is a perfect example.  I took a scrap piece of round steel bar, cutoff pieces of pipe, a rectangle of expanded sheet, and assembled them into unit that dominates the sculpture.

As can be seen, I stuck with the natural steel finish.  It is wire brushed in places and not others to combine to give both a polished and rustic finish.  A gloss lacquer finish is applied to protect.

Unique Garden Sculpture

2014-05-26 18.47.55

Steel Garden Art

My latest creation is the unique Indoor/Outdoor garden steel sculpture pictured above.   It is of a natural steel colored finish in an abstract floral type shape.  I has several coats of clear coat to hold back the elements. The emerging summer season inspired me to create a sculpture that was distinctly metallic yet botanical style.  It should do well in any garden environment or even as a center piece on a dining room table.  Garden sculpture is another avenue I wish to explore in the styles of metal art I create.

2014-05-26 20.01.48

Heavy Duty Steel Base

Most of the weight of this composition is in the circular base that all the various length rods are welded to.  It might only be 5 inches in diameter but it is solid steel and up to 1 and a half inches thick at its thickest point.  No danger of this sculpture blowing away unless there is a nuclear explosion nearby!

2014-05-26 18.51.25

Unique Versatility

If you are looking for a unique kitchen organizer,  this sculpture might have something to offer you in the most unexpected way.  The rods are 3/8″ in diameter and can accommodate many kitchen utensils.  Although it is recommended you use this on an island or external counter top due to the wide span of the top of the sculpture.


This unique composition is one of a kind and available at my Etsy shop.

Torch Firing Vitreous Enamel to Abstract Copper Sculpture Accents

2014-04-22 13.07.50

Melting Colored Glass On Metal

Just when I thought of every conceivable way to add to the methods of enhancing metal sculpture, I discover a whole new world of artistic exploration.  This time, encouraged by my father, I am examining the world of vitreous enamels.  More specifically, the enamels designed for metals.  In this post, I will be applying a transparent enamel directly to copper. Below, you will see the supplies I have for applying enamel.  I have a bottle of a gum solution used as an adhesive. The gum solution dries fairly quickly and when the powdered enamel is fired at roughly 1500 Fahrenheit, no residue of the gum remains.


2014-04-21 19.08.192014-04-21 19.08.14\

I also have a 2 ounce jar of Thompson Enamel 2410 Copper Green, a small sifter, and two fold formed copper panels.

2014-04-21 19.08.342014-04-21 19.09.18

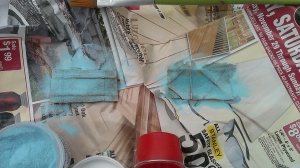
I first brush on the gum solution straight from the bottle onto the fold formed copper panels. Without wasting too much time, I get my sifter and extract some of the enamel powder from the jar.  I gently sift onto the panels.

2014-04-21 19.14.032014-04-21 19.15.36

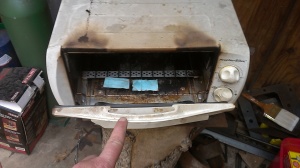
I shake off any excess enamel and put it back in the jar for later use.  I have a defunct toaster oven preheated to 250 Fahrenheit.  I place my enameled panels in there to dry the gum solution.  I usually wait fifteen minutes to be sure the copper is thoroughly hot and the adhesive is completely dry.

2014-04-21 19.21.552014-04-21 19.21.41

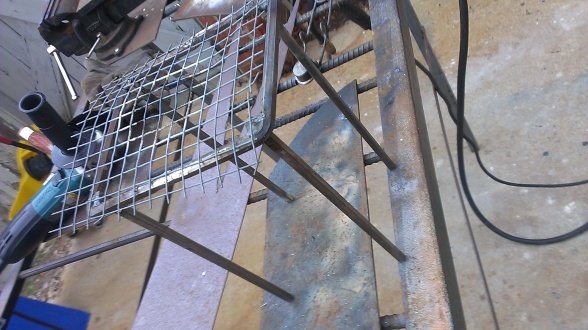
I then get out my heating stand and very carefully hold a neutral oxy acetylene flame near the panels.  The oxy acetylene is actually too hot for enameling so you must be alert and intently focused to prevent burning through the copper.  A transparent enamel allows one to see all the phases of torch enameling.  First the copper oxidizes under the enamel as it begins to fuse.  Just then, the enamel will acquire a orange peel texture.  It still needs more heat at this point.  The next stage is some of the opacity is changed into a more transparent affect.  It looks as if you are driving tiny bubbles out of the enamel.  Also the oxides will start dissolving into the enamel.  This allows for a more metallic look under the enamel.  When the desired look is achieved,  the torch is turned off and the panel is allowed to cool.

2014-04-21 18.20.022014-04-21 18.19.59

After the panels are cooled off, I place them in a copper chloride etching solution.  I made the etchant myself from water, muriatic acid, hydrogen peroxide, and scrap copper.

2014-04-22 13.07.50

For the first ever try at torch enameling, I did not do half bad.  They look rough due to the lack of metal prep but I am after the brutalism look anyway.

Small Tabletop Heating stand for heating and enameling

IMAG3086

Convenient Hands Free Stand for Heating

I recently obtained a couple of jars of Thompson Enamel that I want to apply to copper.  I had some scrap hex steel bar and some left over square bar.  I hand bent two equal length hex bar sections into brackets that were welded together to form a square frame with rounded corners.   The legs were made from 1/4 inch square steel bars.  It stands a little over 9 inches tall.  This is a perfect height to put a torch under what ever small metal work that needs to be heated.   This stand is ideal for enameling copper, brass and silver or for annealing copper alloys for hammering and shaping.

IMAG3085

Here is the metal stand with a scrap piece of hardware cloth.  This offers a porous support for heating copper sheet for shaping, fold forming, and copper enameling.  Another way to utilize this versatile stand is a trivet.  This is a solid metal support.  If I need to heat with the oxyacetylene torch,  I need something stronger than hardware cloth.  That is because the intense heat from the torch can melt through and burn the wires of the hardware cloth too easily.  When I need a less intense heat, like for annealing copper, I use MAPP gas torch with the wire cloth.  Pictured below is the triangular trivet I made today.

2014-04-21 13.43.13

I want a triangular trivet in a tripod format.  The tripod shape allowed for both the maximum support and open area so I may have plenty of room to navigate my torch flame around the work to be heated.  I started by measuring three triangles from some scrap 16 gauge steel sheet.  Each triangle was 1 1/2 inch high and 2 and 3/4″ long.

2014-04-21 13.21.522014-04-21 13.33.12

Once I had all my triangles ready, It was time to weld them in the desired patter.  I brought out my heavy duty handmade fixture.  The idea was to temporarily tack weld the triangles into position  like so.

2014-04-21 13.36.122014-04-21 13.37.142014-04-21 13.38.55

The third triangle was welded instead at the vertex.  Then I used the angle grinder with a cutoff wheel on the first tack weld.  I was able to easily pry the newly made trivet off my welding fixture.  I proceeded to grind the surface smooth for the next task this fixture will be used.

2014-04-21 13.42.122014-04-21 13.42.15

Above you will see that I added reinforcing welds to both sides to increase the integrity of the trivet fixture.


Handmade Heavy Duty Welding fixture

2014-04-13 15.41.25

A Welders Helping Hand

If you have ever worked in electronics or know someone that has, you probably have seen one of those helping hand rigs.  They usually come with two alligator clips at the end of two articulated arms and a magnifier in the middle.  It is usually mounted on a base of substantial weight to stabilize it.

Well, at one point or another, a welder or metal smith will require some assistance.  A virtual third hand if you will.  That is how I came up with the contraption featured here.

2014-04-13 15.41.43

Some One Inch Steel Block and a Non-working Clamp

When I came upon this really thick block scrap, I knew it was destined for welding fixture use.  Just was not sure how I would approach the concept.  Once I had my stick welder plugged in and the blocks in my hand, it did not take long to come up with a plan.  I first wire brushed the two blocks and set the angle block on the larger rectangular one.  I then ran beads of weld all the way around to be sure they would NEVER part ways. The angle surface serves as a base where I can temporarily tack weld round or odd shaped objects to it to hold pieces steady while I weld other pieces to it freeing up one of my hands.  See the rear view for the angled block below.

2014-04-13 15.41.12

It was at this moment that I could make my fixture truly my own.  I remembered I had this old clamp that was crooked and never worked right.  I bought it at an auction to get the other two really nice ones.  Auctions have a funny way of putting duds in a lot to get rid of junk slyly.  Well, never fear, that clamp has a new purpose in life.

2014-04-13 15.41.55

I cut off the offending bottom piece and welded what remained on the block.  I will possibly modify this further in the future.  I am just now thinking of possibly cutting a 3 inch piece of 2inch angle iron and welding it upside down on the end of the clamp so it can hold tubing and well as flat metal objects.  More on this later.


An Iridescent Abstract Table Sculpture

IMAG2672


Vibrant Iridescent Glazes

I present this finished work as a followup to my post “Braving Bitter Cold to Create Metal Art”.  Although the Reflex Violet Pearl Ex mica pigment that was airbrushed looks cool, the real magic is the layers of blue green paint on the triangulated plate.  A base of opaque blue green was followed by various shades of turquoise and blue.  The  final touch was a glaze made from gloss acrylic medium and metallic blue green.

IMAG2676IMAG2674

Playful Golden Curve

The purple and the iridescent turquoise glaze are stunning for sure but a little on the cool side.  This sculpture needed a contrasting color for the curved accent.  The royal gold color answered this call well.  It is warm and sunny but not so blazing hot that is takes the focus away from the background.


In the past, I usually painted the bases to my table top sculptures gloss black.  This time I used phthalo blue.  The base will look great against a light colored marble surface.

This post modern table sculpture is available in my Etsy shop.